Five Effective Ways to Unclog Hair from a Bathroom Sink

Five Effective Ways to Unclog Hair from a Bathroom Sink

Clogged bathroom sinks are a common occurrence among homeowners and renters. If you notice the sink is draining slowly, this is normally a good chance it’s clogged with hair. Many may try to unclog the sink themselves, but if unsuccessful calling a local plumber will give you longer-lasting results. Here are five of the most effective ways to unclog hair from a bathroom sink:

  1. Use a Chemical Drain Opener

One of the most common and popular ways to unclog hair from a bathroom sink is to use a chemical drain opener called Drano. If you want to unclog the drain yourself, you need to remove all hair and then pour Drano down your drain. This product can be purchased for as little as $5 at most hardware stores or supermarkets. Please keep in mind that plumbers have higher-quality drain openers that can clear up the deepest clogs.

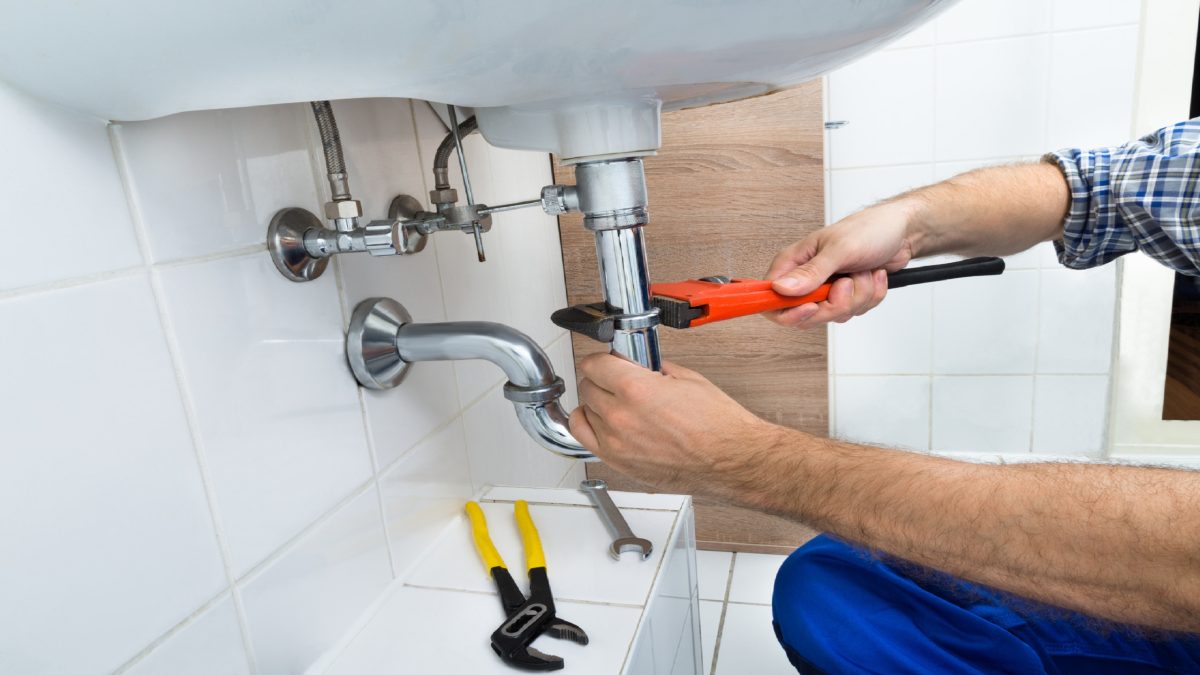
  1. Call a Local Plumber

When you attempt to unclog hair from your bathroom sink using a plunger, there is a very good chance that you will leave hair behind, or there could be another underlying issue that is causing the clog. If the clog is deep, this may cause damage to the plumbing system. Calling a professional plumber who has commercial-grade tools will get the problem cleared right away without any mess!

  1. Mix Baking Soda and Vinegar

If you have a clogged sink and don’t want to use chemicals, just mix together baking soda with boiling water. First, pour a gallon of boiling water down your sink, then place ½ a cup of baking soda into the drain, followed by 1 cup each vinegar or cider vinegar and boiling water. Pour the mixture on top of the baking powder. The solution will begin to bubble and slowly start to drain into the sink. If possible, let this set overnight, since the solution will outline any stain/clogs which may exist within the pipes without damaging them. The following morning flushes the sink with hot water to get rid of any residue.

  1. Buy a Pipe Snake

Pipe snakes are available at nearly every hardware store or supermarket, they are a cheap and easy way to clear a clogged drains. You need to make sure not to use steel ones in the plumbing systems unless directed by a professional, as iron may cause damage over time. However, these pipe snakes can be difficult to use for someone who doesn’t know how. Most pipe snakes are at least 18” long with thorny edges that will that hook onto hair as you lower and raise the pipe snake into the drain. Plumbers often use longer versions of these tools, they are able to use at different angles in order to get rid of stubborn blockages with ease!

Check out this article for some additional ideas!

5 Natural Ways to Unclog a Bathroom Sink

  1. Turn off the water, clean out everything underneath the sink, position a bucket for excess water, and close the stopper completely.
  2. The next thing you need to do is remove the stopper in the bathroom sink. To do this, get under the sink and release the stopper by squeezing the spring clip to remove the pivot rod from the clevis strap. Once the pivot rod is removed from the clevis strap, the stopper should pop right up and out of your sink.
  3. This is where is gets gross, so make sure you have your rubber gloves on. With the stopper loosened, you can pull it out of the sink drain. This is where you need to clean the stopper mechanism of all dirt, hair, and debris. Do NOT turn on your bathroom sink to do this! If you need water, use a different sink to clean the stopper. Bleach and rubbing alcohol should help.
  4. After cleaning the stop-up mechanism, you will want to grab your wire hanger and bend it into a shape that will help you hook globs of hair and gunk. Think the shape a backscratcher or fishing hook. Once you have the right shape, lower the hook into the drain and once you feel a blockage, start twisting and moving the hanger to catch as much gunk as you can.
  5. Try to remove as much gunk as you can with the wire hanger. You can also use an old toothbrush to help clean the interior sides of the pipe. Some hair and gunk may also be able to be pulled out through the opening where the pivot rod was removed.
  6. If you think that there is a big clog in the P-bend of the pipe, where you can’t get to with the hanger, then you may need to unscrew the P-bend section of the pipe. This may or may not be necessary, depending on the seriousness of the clog.
  7. Put everything back together again. Run some hot water down the drain to test the results of all your hard work. After reassembling all of the pieces, while you are down there, inspect everything for leaks and corrosion.

Here https://happyhiller.com/blog/5-natural-ways-unclog-bathroom-sink/

Source: https://barrypeterson0.blogspot.com/2022/08/five-effective-ways-to-unclog-hair-from.html

Try These 4 Tricks to Unclog a Blocked Kitchen Sink Drain

Try These 4 Tricks to Unclog a Blocked Kitchen Sink Drain

A clogged sink is one of the most annoying plumbing problems, and kitchen sink clogs happen all too often. Even something that seems like a minor clog can cause much bigger problems if it isn’t dealt with. The bad news is that blocked drains can happen frequently and unexpectedly. The good news is that there are some easy tricks you can use to take care of a sink clog!

Here are 4 techniques you can use to get your sink cleared in no time.

  1. Use your garbage disposal

If you have a garbage disposal, one of the first ways to try to clear a clogged kitchen sink is to try running your garbage disposal to see if you can break up any large blockages. If you notice that your garbage disposal won’t turn on, you may need to press the reset switch to restart your disposal and try again. If this still doesn’t work or if your kitchen drain clog just won’t seem to go away, you may want to call a professional plumber for assistance.

  1. Create a natural DIY drain cleaner

Making your own natural drain cleaner is easier than you might think, and you can make one with just a few ingredients you probably already have in the house! Start by getting rid of the standing water from inside of your sink. Then, pour one cup of baking soda down the drain. Next, pour a full cup of white vinegar down the drain. Cover your drain tightly with a stopper for about 15 minutes before running hot water down the drain to break up clogs. This natural baking soda and vinegar mixture is a great way to clear a clogged sink.

  1. Use a plunger

Having a plunger in your home is a necessity, and believe it or not, plungers aren’t just for toilets. That said, there are many different types of drain plungers, and for clearing clogged kitchen sinks, the best one to use will be a flat-bottomed plunger. Start by filling up your sink about halfway with hot water to create a seal around the drain. Then, place the plunger over the drain and plunge a few times to see if it helps the drain clear. Repeat as needed.

  1. Run boiling water down the drain

When you’re trying to unclog your kitchen sink, one of the easiest things you can try is to heat water on the stovetop or in a kettle and pour the boiling water down the drain. Then, try running the faucet to see if your drain will run smoothly. Boiling water can help melt away any soap residue, grease, and other buildup that could be blocking your drain. You might need to run hot water down the drain a few times to fully clear a clog. There’s an important caveat, though: you shouldn’t try this technique if your drainpipe is made of PVC, because this material can be damaged by boiling water.

What Next?

If you try these 4 tricks and still don’t have any success clearing your drain, it may be time to reach out to an experienced plumber. It’s worth trying to clear a drain yourself, but sometimes, drain clogs are a sign of a bigger issue that requires professional plumbers. If pouring hot water down the drain, using baking soda & vinegar, running your garbage disposal, or plunging your sink doesn’t work, it’s time to call for an expert opinion.

Check out this article for some additional plumbing ideas!

Kitchen sink not draining? Here are 6 ways to unclog it

When it comes to the kitchen sink, for instance, don’t think Drano and other chemical-based drain cleaners are the easy, go-to fix. The chemicals can sometimes cause more damage to your system, even if the clog seems fixed initially. Plus, backsplash from stubborn blockages could seriously harm your skin and eyes. You can avoid these catastrophes with other clog repair methods, some using common household items and others requiring some straightforward plunger or plumber’s snake action.

Don’t call the plumber yet! There’s a good chance you can fix the problem yourself with one of these six methods to unclog a kitchen sink:

Here https://www.homeserve.com/en-us/blog/how-to/unclog-kitchen-sink/

Source: https://barrypeterson0.blogspot.com/2022/07/try-these-4-tricks-to-unclog-blocked.html

Avoid a Hair-Raising Nightmare in Your Drain

Avoid a Hair-Raising Nightmare in Your Drain

It is pretty disgusting to be stuck in ankle-deep dirty bathwater because your pesky drain is clogged with hair and funk. So what can you do to stop falling hair from clumping together, resulting in a slow drain? Fortunately, there are many ways to prevent them from happening in the first place, and there are also many solutions to eliminate them once they occur. Continue reading to discover how you can fight this pervasive problem.

Avoid Nasty Hair Clogged Drains

The best solution to any problem is to take preventive steps to its onset right from the start. Check out these preventative tips below:Put a drain cover:You can readily purchase a screen intended for the drain in your hardware store. Buy one for every shower in your home. If you don’t want to ruin aesthetics, there are under the drain screens which can trap hair without being too conspicuous.Actively takeout hair: Before you take a shower, make it a habit to brush your hair. This ensures loose hair will attach to the brush and prevent it from falling into your tub floor or sink. In addition, keep a watchful eye for any loose hair in your bathroom so you can take them away before they fall into the drain.Flush out drains:You need to coordinate this endeavor with your family. First, you must shut all the shower, bathtub, and sink drains in your home. Then, fill what you can with warm water. Finally, have someone manning the drain and toilet so you can all open the drain and flush the toilets together. This will flush out all your drains. You can also use baking soda and lemon once a month to clear out your drains.

These top three tips will help you deal with your “hair-raising” clog problem. However, even the most cautious homeowner will eventually end up with slow-moving drains due to wear and tear. Fortunately, you can still attempt to take the hair out on your own.

How to Remove a Hair Clog

When your drain is blocked by hair, DIY removal tricks help you dislodge the problem. Check them out below:Plunge it out:Plungers aren’t just for toilets. You can use them to suck out hair and gunk stuck in your tub, shower, or sink. Just make sure you have a separate one for this purpose. Then, place securely over the drain and plunge out the block.Try natural solutions:Instead of using a toxic store-bought de-clogger, try pouring boiling water down the drain. Alternatively, use a concoction of ½ cup vinegar and ¾ cups baking soda followed by boiling water. The chemical reaction will help unclog debris.Manual removal:Wear a pair of gloves to fish out hair and remove the clog manually. You can also try a bathtub claw to fish out debris.

SOS For Professional Assistance

When you’ve tried preventive tips and attempted to unclog, but nothing works, it is time to call a professional for help. A reputable team has the knowledge, sophisticated tools, and correct techniques to help you find relief and restore functional drain lines in your home.

Check out this article for some additional plumbing ideas!

Steps To Take If You’re Dealing With A Hair Clog

Use Baking Soda & Vinegar Before Plunging It Out

Baking soda and vinegar can be an extremely effective way of dispatching many clogs, and hair clogs are no exception. For best results, start by squirting a little dish soap into your drain, followed by a cup of vinegar and a cup of baking soda. Wait five minutes or so, for the chemical reaction of the vinegar and baking soda to take effect, then chase that with a cup or more of boiling water. This should effectively clear out most of the hair clog, however, you should still use a cup plunger on your drain to get rid of any hair that is left behind. Make sure you are using a cup or “flat” plunger specifically, and if the clog is still present, repeat this process as necessary.

Here https://www.smithsplumbingservice.com/blog/2020/august/the-top-5-ways-to-get-hair-out-of-your-drains/

Source: https://barrypeterson0.blogspot.com/2022/07/avoid-hair-raising-nightmare-in-your.html

Extend the Life of Your Pipes

{Extend the Life of Your Pipes}

Your property’s pipes work nonstop every single day. They take the brunt when you flush the toilet, shower, brush your teeth, wash hands, do the dishes, run the laundry, etc. This is because there’s a huge volume of water moving in your pipes. Unfortunately, all the hard work can result in wear and tear. Over time, pipes can thin out, leading to leaks and pipe bursts. Although you cannot stop pipe wear out, you can make it a lot slower. With a little effort, you can extend the life of your pipes. Here are six helpful hacks for that:

Ensure Water Pressure is Right

The number one priority is ensuring your property’s water pressure is at the correct level. When you’ve got very high water pressure, the harsh force will damage pipes and piping joints faster. For best results, check to ascertain the PSI is below 85 to protect your pipes. If you’ve got water pressure issues, ask your plumber to install a water pressure gauge for easy monitoring.

Attend to Leaks Immediately

Ignoring leaks, even the tiny ones, can result in a disaster. Even small drips can escalate quickly, resulting in burst pipes and severe water damage. Although small leaks may not seem like such a big deal, the constant dripping water will wear out your connections. They will eventually grow and worsen the problem even more. Instead, plug any leaks ASAP to avoid complications.

Invest in Routine Professional Drain Cleaning

The gunk will naturally build up inside your pipes, especially if you’ve got an older home. With sedimentation, your pipes will work harder to transport water. In time, the work will wear out the piping interior until they start leaking. Getting an annual professional drain cleanout will help you avoid buildup. As a result, your pipes work more efficiently. You can also keep clogs and leak issues at bay.

Be Mindful of What You Flush

Your toilet is not a trash bin. Don’t flush items that have no business going down the toilet drain. This includes wet wipes, even if the drain says so. When you dump these materials in your toilet, they will collect there. Over time, sedimentation will form stubborn clogs. It also results in chokepoints that alter water pressure. This can result in a leak, backup, or pipe burst. Preserve your pipes by staying mindful about what you flush.

Take Care of Sluggish Drains ASAP

A slow drain indicates there’s a block somewhere in your pipe system. This always results in increased pressure, making your pipes wear out faster. If you notice a sluggish drain, deal with it right away. You can use a plunger or snake drain to clear the block. If that fails, call a professional. Slow drains will not go away on their own and will only worsen in time. With a pro at your disposal, you can ensure your pipes do their job properly for the long haul.

Check out this article for some additional plumbing ideas!

Top 5 Ways to Increase the Lifespan of Your Pipes

Avoid Chemical Drain Cleaners:

This is something we cannot stress enough. If you’re experiencing a drain clog in your home, you may be tempted to purchase a liquid drain cleaner. Yet this is one of the worst things you can do for your pipes. Store-bought drain cleaners contain toxic chemicals that can eat away at your pipes over time. They may eat away at that clog too, but oftentimes they prove ineffective, and end up sitting on top of a blockage rather than getting rid of it, just waiting for a dangerous back-up to occur. For the health of your pipes, not to mention your family, avoid using chemical drain cleaners whenever possible. Instead, call AAA for drain cleaning that’s designed to get rid of clogs quickly, safely, and completely.

Here https://www.aaatoday.com/blog/2020/july/top-5-ways-to-increase-the-lifespan-of-your-pipe/

Source: https://barrypeterson0.blogspot.com/2022/05/extend-life-of-your-pipes.html

Plumbing Quick Fixes That Save Your Home From Damage

{Plumbing Quick Fixes That Save Your Home From Damage}

A sudden pipe leak or an appliance malfunction can damage your property. Unfortunately, you cannot always just wait for a plumber. Water damage is imminent, and ignoring the problem can exacerbate things. Knowing a few basic fixes is vital to help you recover swiftly and without minimized expenses from a plumbing disaster. Here are four easy repairs that could potentially save you from a larger and more expensive catastrophe.

Deal With a Leaking Pipe

It doesnt matter how small your pipe leak is. The main thing is you dont want water infiltrating your home. Even tiny drips can escalate! Fortunately, there are many fixes you can count on to fix the problem. Start by turning off the water shut-off valve to cut water flow. Theres usually one underneath the sink or toilet that connects to the main supply. If the leak is not located near a valve, you must turn off the main water line outside your home.

From there, you can purchase materials from the hardware to temporarily plug the leak. For example, an epoxy compound applied to the leak works like magic for iron pipes. Meanwhile, a clamp or wrap around the leak works best for copper or PVC pipes. But, again, these are temporary fixes until your plumber comes in to provide a permanent solution.

Fix a Leaking Pipe Joint

Just like an ordinary leak, start by turning off the water source. Then, make sure you have repair sleeves that are elastic enough to wrap around the leaking joints. The angle of these joints may make it trickier to fix. Finally, ensure you cover the connector tightly around the leak to squeeze the water back into the pipe.

Some even fortify the sleeves with duct tape to make them last longer. But, again, this fix is not permanent. Eventually, water will follow the path of least resistance and loosen the sleeves. Thats why you must call a plumber before the pipes burst.

Seal Cracked Porcelain

Just like ceramic cups, your tubs, sinks, showers, and commodes can crack, too. However, some of them are full of water, making it a big issue. When you see a crack in your toilet receptacle, it can flood your bathroom. So calm your nerves and shut off the toilet valve.

From there, buy plumbers putty to the inside of the crack. You can also do this to your damaged tubs and sinks to prevent water leaks. Squeeze the putty as tight as you can. This material naturally resists water, and it can hold for a fair amount of time. Apply caulk as a secondary seal to make the putty last longer for the best results. Of course, you must save money for an eventual complete replacement.

Address a Faulty Water Heater

If your water heater is malfunctioning, sedimentation in the bottom of the tank is the most likely culprit. This builds up over time and blocks the heat from warming the water. To solve the problem, turn off the device. Then you need hoses to flush out your water heater. Check out this detailed tutorial.

However, if youre unsure what to do, it is best to call and wait for the plumber rather than worsen the problem. A reliable plumber will make your life easy by making permanent fixes swiftly.

Check out this article for some additional plumbing ideas!

Bad Valve Seat/Washer

Between the faucet and the spout rests the valve seat and washer holding it into place. If these connections wear out or become loose, you can get a leak at the spout. Again, mineral deposits are often the culprit here, corroding the valve seat.

You can also run into problems if the washer was installed wasn’t the correct size. Without a perfect seat, friction loosens the washer and lets water through.

Here https://happyhiller.com/blog/common-plumbing-problems-how-to-fix-them/

Source: https://barrypeterson0.blogspot.com/2022/05/plumbing-quick-fixes-that-save-your.html

How to Fix a Dripping Faucet: The Quick and Easy Guide

The sound of a dripping faucet can be really annoying, even at the best of times. The noise tends to grate on anyone’s nerves after a while, not to mention it can waste a lot of water. Thankfully, though, with just a few simple steps, you can get your leaky faucet fixed in no time!

1. Gather Your Materials

When you’re fixing a leaking faucet, your toolbox will be your best friend. You don’t have to be a handyman to deal with a dripping faucet – there are just a few tools you’ll want to pick up at a hardware store. Here is what you will want to make sure you have at hand:

  • Adjustable C-wrench
  • Phillips-Head and flathead screwdrivers
  • Replacement o-rings/washers
  • WD-40 or a similar oil

Shut Off Your Water

Once you have your tools ready, there are a few things to remember before you attempt any repairs on your leaking faucet. Make sure that both cold and hot water supply lines have been cut by turning off their respective valves. You will want to turn the valves counterclockwise to shut them off. To make sure they are turned off, turn on the tap as a quick test.

Remove the Cap from the Handle Knob

Once the water is off, go ahead and remove the decorative cap from the handle knob with a flathead screwdriver. After the cap has been removed, you should see a small screw that attaches the handle to the faucet’s stem. You can take out this screw using your Phillips-Head screwdriver. Now, you should be able to take the handle off the stem.

Remove the Faucet Stem

To remove the packing nut, get your adjustable C-wrench and loosen it up. Once you do that, you should be able to see the stem. Depending how your faucet is set up, the stem may pop right out. If not, you may have to twist it off from the valve. Be sure to check all of the parts for any damage or wear and tear after you remove the stem.

Change the Rubber Ring and Washer

At this stage, you will want to replace the O-ring that is positioned around the middle of the stem. This rubber ring needs to be replaced with one that is exactly the same size; you will run into problems if it doesn’t fit properly! Next, you will want to replace the washer. The O-ring and washer are the two most likely causes of your dripping faucet, and you will want to make sure the new parts you use are the correct size. This should help make sure the dripping stops.

Replace the Faucet

After you have replaced the washer and O-ring, be sure to carefully reassemble your faucet in reverse order of removal. Over-tightening anything could cause leaks and other issues, so you will want to make sure you dont over-tighten anything. Once you are done, simply test things out by turning on the water. If you still notice dripping or leaking, it may be time to call a professional plumber for more advanced repairs, as this could be a sign that you have a larger problem, such as corrosion of the valve or torn seals. A professional plumber will be able to remedy these issues.

Check out this article for some additional ideas!

How to determine the cause of a leaky faucet

How to determine the cause of a leaky faucet

It’s best to always be vigilant of dripping faucets, as a single leaky fixture can waste 20 gallons of water a day! Give your sink a once-over to try to identify the source of the leak. If water is pooling around the stem of the faucet, you most likely need to replace the O-ring or tighten the packing nut.

If the leak is coming from the spout, there’s most likely a problem with the faucet handle. At this point, it’s helpful to have some knowledge about which type of faucet is in your home. The Spruce explained that a cartridge faucet is most common in modern homes, and you’ll typically need to replace the cartridge.

A compression faucet, on the other hand, is more typical in older homes. The rubber seals can wear out over time, so replacing them can usually remedy a dripping faucet.

What you’ll need

Many of the tools you’ll need to stop a leaky faucet can already be found in your tool box. SFGate Home Guides recommended gathering these materials before your get to work:

  • Rags – for easy clean up
  • White vinegar – for cleaning along the way and loosing grim buildup in the spout
  • Phillips and flat-head screwdriver – to remove the screw
  • Replacement parts – to swap out the failed components

Here https://www.homeserve.com/en-us/blog/how-to/fix-leaky-faucet/

Source: https://barrypeterson0.blogspot.com/2022/05/how-to-fix-dripping-faucet-quick-and.html

How to Recognize and Respond to a Plumbing Emergency

How to Recognize and Respond to a Plumbing Emergency

Everyone either has faced or will eventually have to face a plumbing emergency at some point in our lives. Instead of wondering why you are dealing with a plumbing emergency, the real question you should be asking yourself is “What next?” Fortunately, you don’t have to deal with this alone!

What is a Plumbing Emergency?

Not every plumbing emergency is a one-size-fits-all situation, but there are some telltale signs that should be considered. A plumbing emergency is best defined as a plumbing-related issue that poses the risk of serious damage to people or their property. Just a few examples include overflowing toilets, broken water heaters, burst pipes, and leaks. Below, we will talk more about some of the different types of plumbing emergencies you may encounter.

Broken Toilets

Backed-up toilets are unfortunately a common plumbing problem. If your toilet is overflowing, it could be due to a clogged drain, blocked vent pipet, or malfunctioning float. Depending on what is causing the issue, you may need a plumber to provide drain cleaning services or professional toilet repairs.

Broken Water Heaters

If you’re noticing that there’s not enough hot water to have a bath or wash your hands comfortably, then there could be an issue with your water heater. Sometimes, these problems can be easily resolved by simply checking the breaker switch for your water heater to make sure it hasn’t been tripped. If your breaker hasn’t been tripped, though, there may be a problem with your water heater. For safety reasons, it’s always safest to contact a professional plumber who can diagnose and repair a broken water heater.

Water Pressure Issues

The easiest way to identify a low water pressure issue is by going through your home and turning on all of the faucets. If you notice that you have weak water pressure in your home, it could be an indication that you have a leaky or frozen pipe somewhere in your property. If you suspect that something is wrong with your water pressure, call an emergency plumber before the issue gets any worse!

When You Can’t Fix Your Plumbing Emergency Alone

Sometimes, you might be able to find an easy way to deal with a plumbing issue yourself, but when it comes to plumbing emergencies, it’s always best to seek professional help. Emergency plumbers can come out to your property at any time so you don’t have to risk the safety of yourself or your property by trying to deal with a major leak or flood. Don’t wait; call a 24/7 plumber today!

Checkout this Plumbing Article

Before You Call a 24-Hour Plumber

Diagnose the Urgency

Assess the urgency of the repair before you make any calls. If it is an overflowing toilet, turning off the water will stop the damage and the repair can wait, as long as you don’t flush. And pretty much any other localized problem can usually wait until morning, provided you are able to turn off the water to the problem area and have other fixtures that can stand in for a short time. For example, a bathroom sink that springs a leak on Friday night can wait until Monday morning for a standard plumber, provided you can shut off the water and have a second bathroom or a kitchen sink that can be used in the interim. You can avoid paying a premium for a service call in the middle of the night or on a Sunday or holiday if you can somehow make do until regular business hours resume.

Here https://www.thespruce.com/before-you-call-a-24-hour-plumber-2718674

Source: https://barrypeterson0.blogspot.com/

5 Pool Maintenance Musts: Here’s How to Avoid Excess Calcium Deposits

5 Pool Maintenance Musts: Here’s How to Avoid Excess Calcium Deposits

Pool maintenance is essential to ensure that your water is safe. It’s particularly important to prevent calcium carbonate levels from getting too high. Not only can excess calcium cause unsightly rust stains on surfaces and white build-up on metal fittings, but high calcium carbonate levels can also lead to bigger problems, eating away at important pool equipment, like filters and chlorine dispensers. Fortunately, there are 5 tried-and-true ways to maintain your pool and prevent calcium from building up

Keep an Eye on the pH Balance of Your Pool

When the pH level in your pool gets imbalanced, the alkalinity can cause issues like algae growth, calcium deposits, and cloudy water. To make sure that your pool water is safe and clean, it’s important to make sure the pH levels are balanced properly. If you don’t have the time to check your water’s chemical balance on a regular basis, why not speak with pool maintenance professionals who can complete chemical balance checks for you?

Check Your Pool Water Temperature

Excess calcium can sometimes arise due to extreme water temperature, as well. The colder your water, the better, since calcium is more soluble in cold water and won’t have as many opportunities to build up. If your pool water gets too warm, you are more likely to end up with a pH imbalance. Keep an eye on your water temperature to make sure it isn’t getting too warm.

Aim for a Balanced Level of Calcium in Your Pool

Given that high calcium levels in pool water can cause a variety of issues, such as cloudiness and equipment failure, it might seem tempting to remove calcium from your pool altogether. However, if the calcium levels in your pool are too low, you can wind up with other problems with your plaster pool walls and metal fittings. It’s essential to have just the right level of calcium in your pool. The ideal calcium level ranges from 100-400 parts per million. If you’re not sure how much calcium should be in your pool water, it’s best to consult a professional.

Use Your Water’s Hardness Level as a Clue

If you notice particularly hard water in your pool, this could be a symptom of high calcium levels. If your water is extra hard, you will want to balance it with a water softener that will combat the high calcium content. Water softeners can also help remove pool stains. On the other hand, if your water isn’t hard enough, this may be a sign that you don’t have enough calcium in your water, and you may need a water hardener. Extremely hard or soft water can be a signal that you need to rebalance your pool water.

Schedule Professional Pool Care

If you’re feeling overwhelmed by all of the steps involved in keeping your pool water safe, you may want to seek professional help. Experienced specialists can recommend and implement a maintenance plan to ensure that your water is properly balanced. Although scheduling professional pool maintenance may sound costly, it can actually save you a lot of money, time, and stress in the long run by preventing major problems down the road.

Check out this article for some additional ideas!

Removing Calcium Carbonate

The best ways to remove calcium carbonate is to use a calcium releaser/cleaner, preferably an acid-free product, so it doesn’t ruin the finish of the pool tile or glass.

Next, you can try using a pumice stone or scale remover. What you use depends on your pool’s surface.

If you have tile or concrete, a pumice stone is perfect for removing scaling. It’s important that you keep both the pumice stone and the surface wet to prevent scratching.

You can also use a commercial stain eraser to remove calcium carbonate. Stain erasers make removing calcium carbonate deposits easy. They’re designed for specific areas and have an attachment to make it easier to reach areas.

If your pool surface is fiberglass, then you’ll want to use a scaling treatment. Most scaling treatments are safe for any pool surface. The treatment is added to the pool water. Over several weeks the deposits are slowly dissolved until completely gone. There’s no scrubbing involved.

Removing Calcium Silicate

Calcium silicate deposits are removed with a pumice stone and a whole lot of scrubbing. However, you can only use a pumice stone on tile or concrete. If you have a fiberglass pool, a pumice stone will scratch.

Your other option is to then use a professional calcium remover. It will dissolve the deposits.

You should first test the product to make sure that it doesn’t scratch or discolor the surface. With stubborn scales, you may have to reapply the remover several times until the surface is free of all scales.

Here https://www.layorcare.com/what-to-do-if-your-pool-has-calcium-buildup

Source: https://ift.tt/h9SyV4t

Common Plumbing Problems and How You Can Fix Them

Homeowners run into a lot of different plumbing problems, and some can be quite pesky. However it is possible to fix these simple issues yourself at home without having the expense go out for professional help! Check off my list below:

Tub Drain is Sluggish

Have you ever had to clean out your bathtub? It’s one of the most used fixtures in a bathroom, but it gets dirty easily. You’ll find hair and soap scum along with dead skin cells or other gunk that builds up over time when popping open the drain cover before things get too clogged! Pour some cleaner down there after using this tool (a “claws” is what they’re called) for an immediate refreshment on those lines inside pipes where all these different substances travel before reaching their final destination: our sewers below ground level.

Water Pressure is Low

There’s a problem with the water pressure from your sink, and you’re wondering if it could be an issue on both cold and hot lines? No matter what kind of trouble is causing this problem though – whether its low volume output at just one faucet- there’s easy solutions so long as we can get rid of all those mineral deposits built up inside their pipes! 

Garbage Disposal System Malfunctioning

This is an annoying problem but can be easily fixed by yourself. But if you lose your key, have an Allen wrench available to unlock the motor from where it’s stuck; otherwise called “guts.” You’ll need some sort of tool like this when working under the sink-, look for slots or openings on either side (but usually one side) near front lip/door handle area which will allow access into internal section containing blades.

Cutting a circuit breaker may seem like a daunting task but it’s actually quite simple. All you need to do is turn off your unit and remove any wires from their proper locations on either side with wire cutters before getting access into the sink or garage where there’s usually room for two people if want this problem fixed even sooner!

Toilet is Running

When your toilet is running, it can be an annoying problem. You might think that the tank won’t fill up because of this but what you’re really doing is wasting water and spiking up bills for something that is a simple fix.

All you need is a replacement flush valve or flapper which are very cheap parts in comparison! If everything else fails, then try replacing those two things before moving onto more serious issues.

Sink Draining Slowly

Common Plumbing Problems and How You Can Fix Them

If your sink is clogged with hair, grease and other stuff that won’t go away even after you’ve washed it multiple times, then clearing out the drain might be what’s needed. There are many ways of doing this – one way would involve using plumbing tools such as pipes or hooks so they can get into all those hard-to reach places where dirty water has built up over time before finally flowing down smooth again without any problems! You could also take advantage from store bought cleaners made especially for cleaning drains which should do an excellent job at getting rid odors

Check out this article for some additional plumbing tips!

17 Most Common Plumbing Problems & How to Fix Them

Dripping Faucets

We’ve all come across this problem at some point in life. Dripping faucets not only lead to water wastage and cost you money, but they can also be a nuisance. Usually, the issue arises due to worn-out washers or O-rings that can be easily replaced. However, corrosion or even improper installation of the faucet can lead to dripping.

So, how do you tackle this plumbing problem? It’s best to seek assistance from faucet repair services as soon as possible to prevent further wastage of water. But even an average householder can also fix the issue with proper tools and a bit of prior plumbing experience.

Slow or Clogged Drainage

Drainage problems like slow or clogged drains can lead to plumbing disasters and even health hazards, so they need to be tackled quickly. Now, if you notice obstruction in only one drain of your home, it means that the issue is localized in the area of your home.

These drains are usually clogged due to the build-up of hair, soap, and other foreign objects over time. The only solution to this plumbing problem is routine drain cleaning.

Here https://www.architecturelab.net/most-common-plumbing-problems-and-fixes/

Top 3 Clever Hacks to Do When You Discover Leaking Water Lines

Discovering leaking water lines in your home is not just frustrating and annoying. If you don’t get a quick fix, it can lead to property damage. Even ignoring a small leak can escalate and result in a sky-high repair bill. Most of all, you don’t want to worry about collateral damage like wreaked carpets, drenched floors, mold, and the like. If you have an emergency water leak in your home, follow these hacks until you can find a reputable plumber to fix it.

Turn Off the Valve

In some cases, you don’t need to turn off the water in your whole house. If it is a simple leak in your toilet or an isolated leaky faucet, you can directly turn off the emergency valve located behind the toilet or under the sink. However, if it doesn’t work, you have no choice but to shut down the main water valve outside the house.

Prevent Further Damage

Even if you catch that small water leak before it floods your home, water could still have soaked into your floorboards, carpets, and walls. To prevent further damage, dry the wet area as much as you can with old towels and shirts. If the soaking is extensive, a wet-dry vacuum and electric fans will speed up the drying process. This prevents mold and mildew growth, which can cause health issues down the line.

Try the Following Temporary Fixes

Now that you’ve cut off the leak source and stabilized your home, you need to temporarily fix the leak. This allows you to use the water in your home until a plumber comes. Here are some clever hacks that could help:

1) Rely on good old epoxy

Every local hardware story has epoxy glue that’s suited for leaks. If you know where the leak is coming from, apply epoxy in the area and wait for it to set. For best results, follow the directions on the container.

2) Use rubber and a clamp

If you have rubber and clamp in your home, you can plug the hole until your plumber provides a temporary fix. Cut the rubber into a size that you can wrap around the pipe to arrest the leak. After doing this, apply the clamp to hold the rubber in place. Depending on the damaged area, you may need more than one clamp to keep things tight and prevent water seepage.

3) Try the pencil trick

Another conventional trick to plug the leak relies on pencil and plumber’s tape. Should the water seep from a small hole, you can stick the pencil’s tip until it feels tight and secure. Then, break off the tip and wrap the entire pipe with the tape. This keeps the tip snug in place.

All these tricks provide a temporary fix. If you don’t want the emergency water leak to escalate, call a professional plumber to offer permanent solutions. They will ensure to fix the leak and prevent further water damage in your home.

Check out this article for some additional ideas!

Common Water Leaks In The Home And How To Fix Them

How to fix a leaking plastic water pipe joint

If you spot a leak from a plastic/PVC water pipe joint, then the good news is that you may be able to fix the issue yourself. Remember, water can travel a long way before it drips as a leak, so you need to make sure you know exactly which joint the leak is coming from. Start by drying the area thoroughly and working out exactly where the water is coming from and whether it is the pipe or water pipe joint that is leaking.

Once you know the source of the leak, turn off the water for the affected area, or turn off the water at the mains supply if that is easiest.Then get to work in fixing a leak. If you feel competent, remove and replace the affected section of the pipe. However, this may require cutting tools and equipment you may not have. Alternatively, you can make an easy temporary fix using rubber or silicone repair tape which is quick and easy to use. Repair epoxy can be even easier to use around plastic water pipe joint leaks, and it can mold to fit the shape of the joint.

Here https://www.homeserve.com/uk/living/blog/common-water-leaks-in-the-home-and-how-to-fix-them/

from
https://barrypeterson0.blogspot.com/

From https://ift.tt/udExjL9

Design a site like this with WordPress.com
Get started